Rain Gauge
A rain gauge is a meteorological instrument to measure the precipitating rain in a given amount of time per unit area. The instrument consists of a collection container which is placed in an open area. The precipitation is measured in terms of the height of the precipitated water accumulated in the container per given time and is expressed in millimeters. Rain gauges are great tools to use for monitoring changes in precipitation over time.
How it works:
Anyone can make a standard rain gauge. All you need is a cylindrical tin/steel box. The cylinder should have millimeters marked on the side and a funnel of an equal diameter on top. The rain is collected in the cylinder via the funnel and the water level is measured using the scale. While quite effective and simple, this gauge has some accuracy issues.
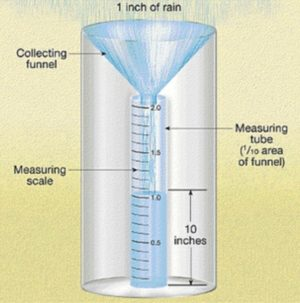
To tackle this, the funnel rain gauge was developed. It consists of a funnel-shaped collector and a measuring tube. The area of the collector is 10 times that of the tube; so the reading is magnified by a factor of 10. This measuring tube is suitably marked to accommodate this magnification. Measurement in both these types is done manually and the protocol is to measure at 8.30 a.m. daily.
Many different types of rain gauges have been developed over time. Automatic rain gauge systems were originally developed to collect rainfall data at remote locations, where logistics prevented regular visits. These are now widely used for their accuracy and also because they can give live readings that are very useful in the era of climate change.

Different Types Of Rain Gauge:
Measuring rainfall can be primarily done in three different ways using three different types of rain gauges. The three major types of rain gauges are the standard gauge, tipping bucket gauge and weighing gauge. Further distinguishing aspects such as how they are set up and how they deliver data can be made, though the basic operation of rain gauges does not usually vary from these primary rain gauge types.
1)The Standard Rain Gauge:
The recording of rainfall using the standard or funnel rain gauge is generally done manually. These gauges work by catching the falling rain in a funnel-shaped collector that is attached to a measuring tube. The area of the collector is 10 times that of the tube; thus, the rain gauge works by magnifying the liquid by a factor of 10.
Magnifying the rain in this way allows precise measurements down to a one-hundredth of a mm. Amounts that exceed the tube capacity are caught in the outer shell of the gauge, allowing the recorder to pour out the liquid in the tube and fill it back up if needed.
2)The Tipping Bucket Rain Gauge:
The operation of a tipping bucket rain gauge is quite different from the standard gauge. The receiving funnel leads to one of two small buckets. Filling of one bucket occurs at one-hundredth of a mm. The result is a “tipping” of the liquid into the outer shell of the gauge, triggering the second bucket to take its place.
The process then repeats itself, allowing for precise measurement of rainfall intensity and amount. This gauge has become standard for wireless weather stations

3)The Weighing Rain Gauge:
The universal weighing rain gauge is optimal for climatology use. This is because of a vacuum that accounts for the effects of wind, allowing more rain to enter the gauge. These gauges are very precise in measuring rainfall intensity as the weighing mechanism at the bottom of the collector can be used to measure depth and time simultaneously. Recording is carried out much in the same way as the older versions of the tipping bucket gauges.

Site Selection For Rain Gauge:
While selecting the site for the installation of rain gauge the following points should be take kept in mind.
- The site should be in levels ground and other types of the ground like hilltops, hill slope, etc undulation type of slope is not suitable.
- The site should be an open space.
- The nearest object from the rain gauge should be kept at a distance of twice the height of the object.
- The gauge should be away from continuous wind forces.
- Other meteorological instruments and the fencing of the site should maintain step 3 above.
- The site should be easily accessible.
- The gauge should be truly vertical.
- 10% of the total number of rain gauge stations of any basin should be self-recording.
- The observer must visit the site regularly to ensure its proper reading readiness for measurements.
DIY Rain Gauge:
 |
| STEP 1 |
.jpeg) |
| STEP 2 |
.jpeg) |
| STEP 3 |
 |
| STEP 4 |
STEP 5: Pour pebbles and water up to the line drawn at the bottom of the gauge, this will help give some stability to the rain gauge.
.jpeg) |
| STEP 5 |
.jpeg) |
| STEP 6 |
Step 2: Calculate Surface Area of Your Roof. Since rainwater is collected from rooftops, you will need to work out the total surface area of roof/s (in meter) that will be used to catch rainwater.
Step 3: Calculating Your Harvestable Rainwater. To calculate how much rainwater can be harvested, multiply your rainfall (mm) by your roof surface area (m2) being used to catch rainwater. The resulting number represents how many litres of water you can expect to collect.
Conclusion:
Traditional rain gauges and weather stations at an individual scale across any city or landscape can help in understanding localized weather phenomena and help us interact with the weather more efficiently and effectively in it.
There are around 100 people who study rainfall in their own homes through the traditional rain gauges. Around 50 homes and offices have installed the automatic weather instruments (Bangalore, 2017)
Maintaining a Healthy Landscape by Watering Your Plants and Grass
How to Spot Local Weather Trends and Patterns
Understanding When to Plant
Understanding the Risk of Flooding
Gaining a More Accurate Picture of Rainfall
No comments:
Post a Comment